
12. GridView
The basic default layout for displaying tabular data in Yii is GridView. It is very powerful, very easy and will be the default layout when you view the index page of a controller that has been generated by Gii for a model. All the table data associated with the model will be displayed in a nice table complete with pagination.
The default pagination is 20 records per page. This can easily be changed to anything you like.
I have loaded the customers table with test data. On my installation, navigating to the customers page (http://yii-basic.loc/customers in my case, yii-basic.loc would be replaced by your domain) produces the following output:
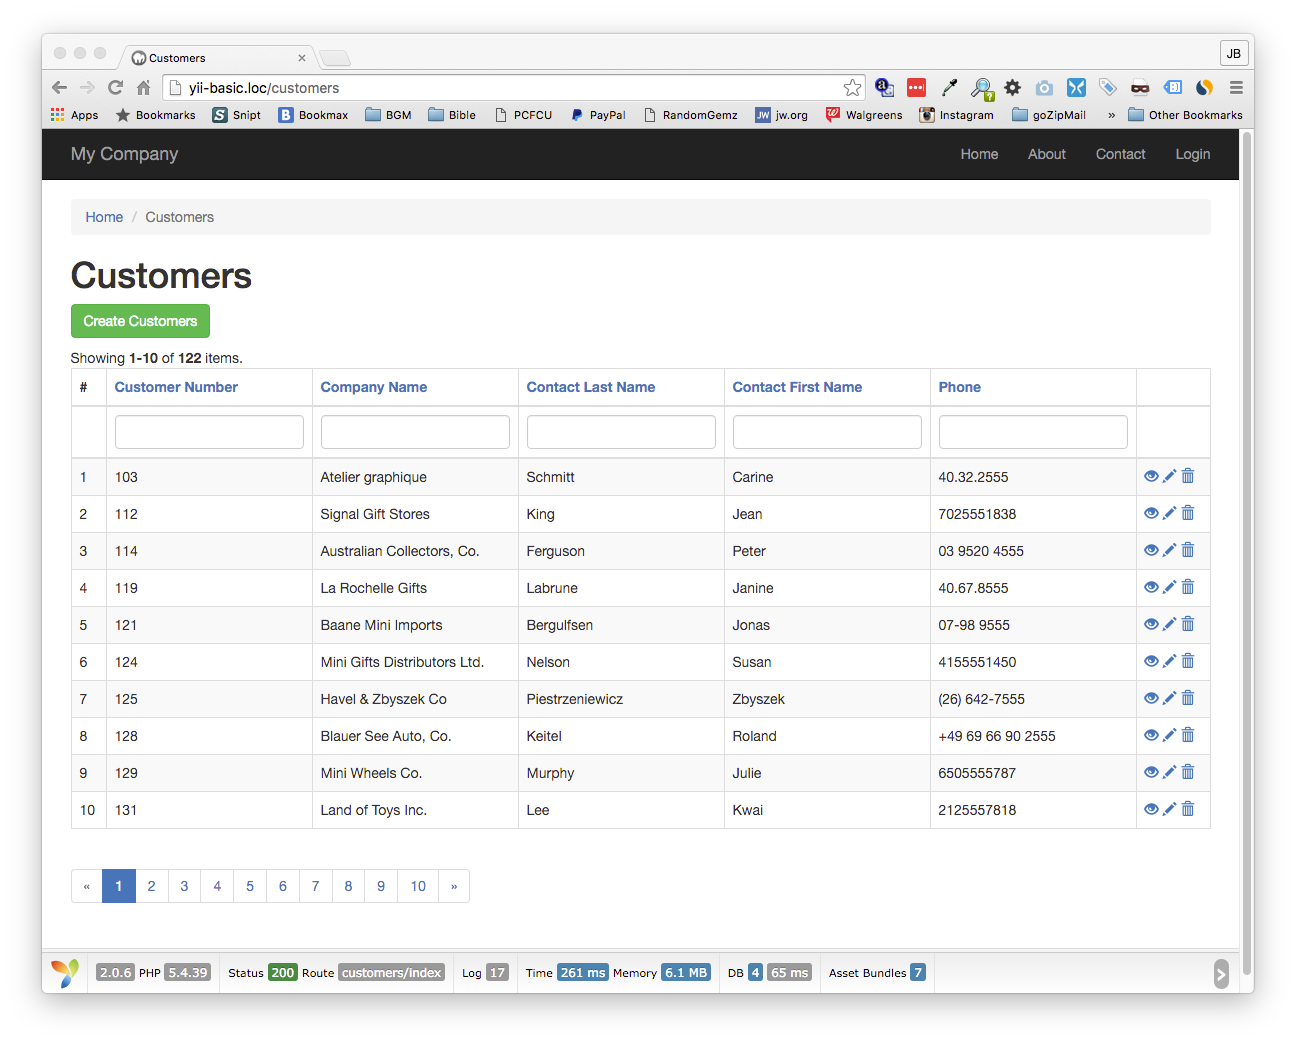
This entire grid is created by default when generating the view code with Gii. You will notice that not all the fields are represented. You can easily enable or disable which fields are shown.
The far left column is simply the grid row count. I generally remove this column.
On the far right is the action column. By default, you will see three icons representing three actions. Clicking on the open eye will display all the data for that one record. Clicking the pencil will allow you to edit the record. Clicking the trashcan will delete the record.
These actions are fully customizable. You can remove any or add new actions as needed.
Right above the grid you will see the row count and what rows are being displayed. In this grid I have changed the pagination to 10 so it is showing rows 1 through 10 of 122 items.
Beneath the grid you will see the pagination controls. Clicking on a number takes you to that page. 10 pages are listed by default.
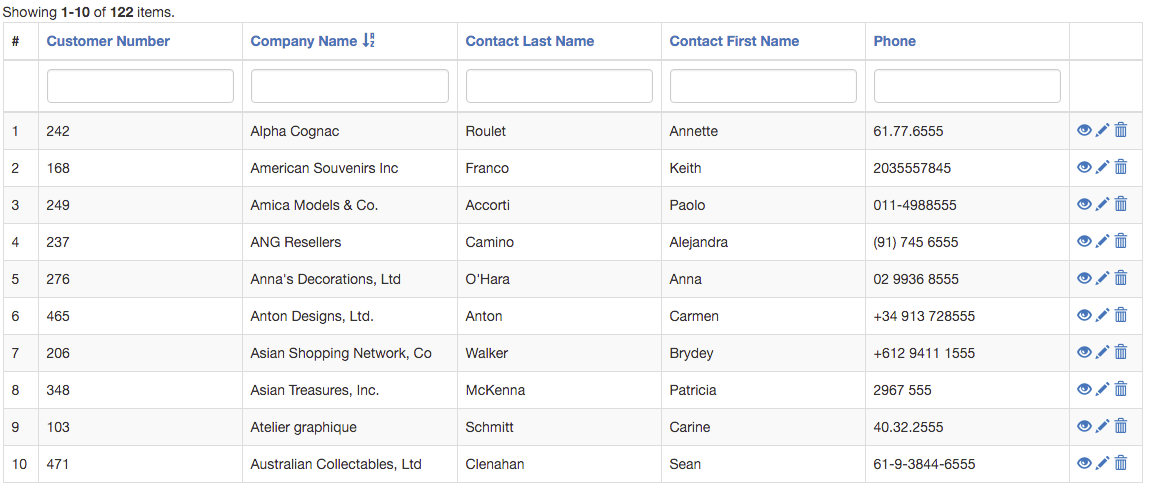
12.1 Sorting
You will notice that the column titles are clickable. Clicking on the title will sort the table by that column. Here is what it looks like when clicking Company Name:
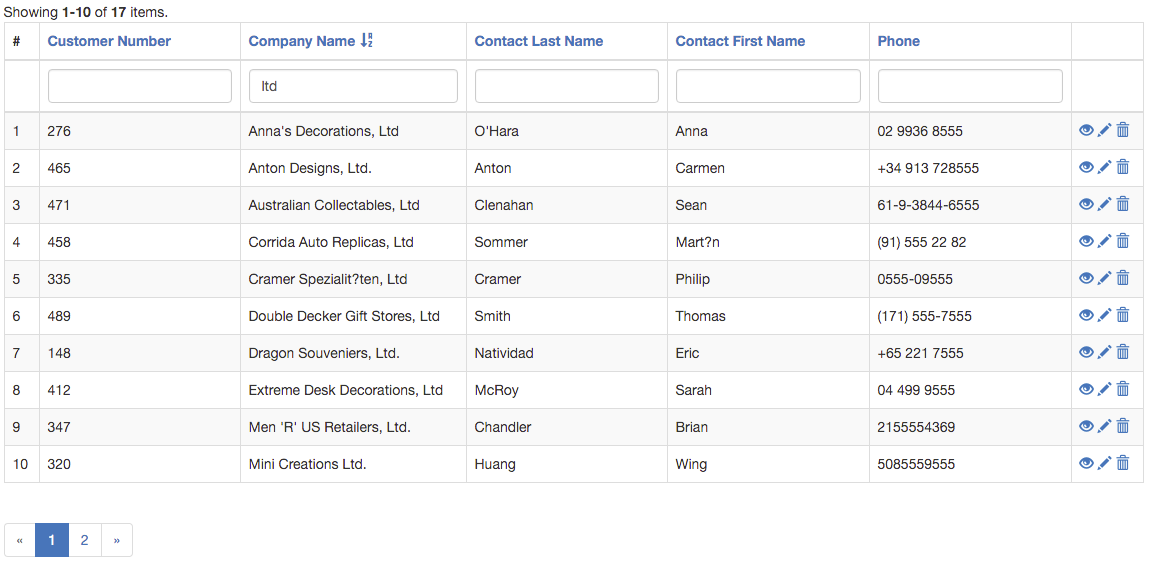
12.2 Filtering
At the top of each column is a text input field. This allows you to filter the contents of that column.
Here is the result of entering the letters 'ltd' in the Company Name input field and clicking 'enter':
12.3 The Grid Code
Here is the code contained in the view file, /views/customers/index.php:
<?php

use yii\helpers\Html;
use yii\grid\GridView;

$this->title = 'Customers';
$this->params['breadcrumbs'][] = $this->title;
?>
<div class="customers-index">

    <h1><?= Html::encode($this->title) ?></h1>

    <p>
        <?= Html::a('Create Customers', ['create'], ['class' => 'btn btn-success']) ?>
    </p>

    <?= GridView::widget([
        'dataProvider' => $dataProvider,
        'filterModel' => $searchModel,
        'columns' => [
            ['class' => 'yii\grid\SerialColumn'],

            'customerNumber',
            'companyName',
            'contactLastName',
            'contactFirstName',
            'phone',

            ['class' => 'yii\grid\ActionColumn'],
        ],
    ]); ?>

</div>
GridView::widget is the function that generates the actual grid. It consists of the following parts:
- 'dataProvider' points to the data used to populate the grid.
- 'filterModel' enables the content filtering.
- 'columns' specifies what columns will be included in the table.
And remember to include the widget with use yii\grid\GridView at the top of the file.
12.4 Columns
The first column is defined by
['class' => 'yii\grid\SerialColumn']
. This simply displays the row number and can generally be removed.
The next five columns match field names in the customers table. To show additional data fields, simply add the field name to the array. If you do not want to show a specific data field, remove the field name from the array.
The last column, the action column, is defined by
['class' => 'yii\grid\ActionColumn']
. This column definition can be expanded and customized as needed.
As shown, it will display the default three icons for the view, edit and delete actions.
12.4.1 Data Formats
Each cell in the rendered grid displays the data for that field according to a specific format. The possible formats are as follows:
| boolean | Formats the value as a boolean. |
| currency | Formats the value as a currency number. |
| date | Formats the value as a date. |
| datetime | Formats the value as a datetime. |
| decimal | Formats the value as a decimal number. |
| duration | Represents the value as duration in human readable format. |
| Formats the value as a mailto link. | |
| html | Formats the value as HTML text. |
| image | Formats the value as an image tag. |
| integer | Formats the value as an integer number by removing any decimal digits without rounding. |
| ntext | Formats the value as an HTML-encoded plain text with newlines converted into breaks. |
| ordinal | Formats the value as a ordinal value of a number. |
| paragraphs | Formats the value as HTML-encoded text paragraphs. |
| percent | Formats the value as a percent number with "%" sign. |
| raw | Formats the value as is without any formatting. |
| relativeTime | Formats the value as the time interval between a date and now in human readable form. |
| scientific | Formats the value as a scientific number. |
| shortSize |
Formats the value in bytes as a size in human readable form for example 12 KB.
|
| size |
Formats the value in bytes as a size in human readable form, for example 12 kilobytes.
|
| spellout | Formats the value as a number spelled out. |
| text | Formats the value as an HTML-encoded plain text. |
| time | Formats the value as a time. |
| timestamp | Formats a date, time or datetime in a float number as UNIX timestamp (seconds since 01-01-1970). |
| url | Formats the value as a hyperlink. |
The default format, if none is specified, is 'text'.
12.4.1.1 Setting the Format
There are two ways to set the data format for a column: The shorthand way and the longhand way.
12.4.1.1.1 Shorthand to Set Format
The shorthand method to set a column format is using this construct: fieldName:Format
Thus, in the example above, if we wanted to set the format of the companyName field to 'ntext', where would change the attribute in the array to: 'companyName:ntext'
12.4.1.1.2 Longhand to Set Format
If you wanted to set companyName field to data format 'ntext', you could also replace companyName with the following code:
[
	'attribute' => ' companyName ',
	'format' => 'ntext',
],
12.4.2 Column Labels
How are the column labels in the header set?
There are four options.
12.4.2.1 Yii Automatically Creates Labels
By default, if you do not set a label for a field, Yii generates a label for you based on the field name.
Camel-case variable names are turned into multiple words with the first letter in each word in upper case. For example, username becomes Username, and firstName becomes First Name.
12.4.2.2 attributeLabels Method
When creating the model for a table, by default a function was included when generating the model through Gii. This function is attributeLabels(). All that this function does is map field names to labels as key/value pairs and returns the array.
Here is the function with the array for reference. This function goes in the customers.php model file.
public function attributeLabels()
 {
     return [
         'customerNumber' => 'Customer Number',
         'companyName' => 'Company Name',
         'contactLastName' => 'Contact Last Name',
         'contactFirstName' => 'Contact First Name',
         'phone' => 'Phone',
     ];
When GridView generates the grid, it processes the attributeLabels() function automatically and gets the labels for each field, which are used to populate the column headers.
12.4.2.3 Label Shorthand
A third way to set the column label is to use a shorthand when setting the field name. The format is as follows:
fieldName:Format:Label
If setting the companyName field to format 'ntext' and specifying the column header label to be Company Name, the shorthand code would look like this:
'companyName:ntext:Company Name'
12.4.2.4 Label Longhand
The final way to specify a column label is to explicitly spell it out as follows:
[
	'attribute' => ' companyName ',
	'format' => 'ntext',
	'label' => 'Company Name',
],
12.4.3 Editing Action Column
The action column works through a templating system. The following code would produce the same output as the default:
[
    'class' => 'yii\grid\ActionColumn',
    'template' => '{view} {update} {delete}',
]
As you can see, the three default actions are listed for the template key. If you wanted to remove the delete action, you would simply change it the code as follows:
[
    'class' => 'yii\grid\ActionColumn',
    'template' => '{view} {update}',
]
There is a lot more customization you can do for the action column, including changing the icons from default, changing the action taken when clicking on an icon and adding entirely new actions with their own icons.
The gridview widget is entirely customizable, however that is beyond the scope of a quick start guide. This is enough to get you started.
12.5 The Data Provider
The big question is, how does the data get from the database into the grid? Let's answer that now.
It all comes down to the dataProvider.
12.5.1 Data Provider and the Controller
Let's first look at the controller as that is what is directing the traffic and connecting the grid to the data model.
The action in this case is index. As you will recall, index is the action called if no specific action is specified in the url. Here is the index action that ties the data to the grid:
public function actionIndex()
{
    $searchModel = new CustomersSearch();
    $dataProvider = $searchModel->search(Yii::$app->request->queryParams);

    return $this->render('index', [
        'searchModel' => $searchModel,
        'dataProvider' => $dataProvider,
    ]);
}
This controller action instantiates a new CustomersSearch object. Remember when we generated the CRUD code with Gii? We generated a second model related to the Customers model: app\models\CustomersSearch
This model does what it says, you pass it search parameters and it filters the data set returned based on those parameters (basically using where clauses in the SQL).

Yii::$app->request->queryParams This property contains the $_GET parameters and can be accessed as needed in controllers. In this case, the parameters passed are the filter and sort requests initiated from the grid. |
On the initial load of the grid page, there are no query parameters so we are basically assigning $searchModel->search() to $dataProvider variable.
We are then passing the searchModel and dataProvider variables to the render function, which passes it to the view for access by the GridView Widget.
12.5.2 The Search Model
Let's take a look at the actual search model to see what is happening. Here is the search function in CustomersSearch.php under models:
public function search($params)
{
    $query = Customers::find();

    $dataProvider = new ActiveDataProvider([
        'query' => $query,
        'pagination' => [
            'pageSize' => 10,
        ],
    ]);

    $this->load($params);

    if (!$this->validate()) {
        // uncomment the following line if you do not want to return any records when validation fails
        // $query->where('0=1');
        return $dataProvider;
    }

    $query->andFilterWhere([
        'customerNumber' => $this->customerNumber,
    ]);

    $query->andFilterWhere(['like', 'companyName', $this->companyName])
        ->andFilterWhere(['like', 'contactLastName', $this->contactLastName])
        ->andFilterWhere(['like', 'contactFirstName', $this->contactFirstName])
        ->andFilterWhere(['like', 'phone', $this->phone]);

    return $dataProvider;
}
The primary method doing the work is ActiveDataProvider. We are passing the static method of find() in the Customers model, which is an instance of Active Record for that model. This is assigned to the 'query' parameter.
You will notice we are also setting the page size to 10 records per page for pagination. If this is left out, the default will be 20 records per page.
|
andFilterWhere This method adds an additional where clause using AND. However, the Filter part specifics that if the operand is empty, it is ignored. If you would rather add an OR where clause, you would use orFilterWhere(). |
The auto-generated where statements use equality for integer field types and 'like' for string. This allows you to filter the grid on partial strings.
The load() function takes the query parameters and makes them available to the Active Record methods for that model.
You will notice that the search model does have its own validation rules. Thus, the validate method can be called to validate any query parameters passed in.