6. Calling Views
What exactly happens when an action is called that provides output to the browser? This is where Views come in.
Let's break down the about action. In doing so, refer back to the file:
controllers/SiteController.php
As noted, when navigating to
http://yiisite.com/site/about
the action
actionAbout()
is invoked in the
controller
SiteController
. As it stands, the 'about' action is very rudimentary; all it does is call a
View to be displayed.
For reference, here is the entire 'about' action function:
public function actionAbout()
{
    return $this->render('about');
}
All this action does is ask Yii to call the View 'about' and send the contents to the browser. $this->render is the method that invokes the view and 'renders' it.
So, where is this view file?
Let's open the 'views' directory and take a look.
As default when installed, you will see two directories: layouts and site. By convention, all views for a controller are located in a directory with the
name of said controller. Thus, the views for the controller
SiteController
are located in the directory 'site'. Open that directory and view its contents.
The view file called by the action is defined by the value passed to the render function. In the 'about' action, we are passing the value 'about'. This
will call the view file:
/views/site/about.php
An action can be associated with more than one view, but will only render one at a time. (You can call views from within views as well.)
The 'about' action may be modified as follows:
public function actionAbout()
{
 if (!empty($istrue))
  return $this->render('foo');
 else
  return $this->render('about');
}
In the above example, if the variable
$istrue
is set and the value is true, the view
/views/site/foo.php
will be rendered. Otherwise, the view
/views/site/about.php
will be rendered.
6.1 Anatomy of a View
Let's delve into the about.php view and examine it's parts.
Here is the content of the about.php file for reference:
<?php

/* @var $this yii\web\View */

use yii\helpers\Html;

$this->title = 'About';
$this->params['breadcrumbs'][] = $this->title;
?>
<div class="site-about">
    <h1><?= Html::encode($this->title) ?></h1>

    <p>
        This is the About page. You may modify the following file to customize its content:
    </p>

    <code><?= __FILE__ ?></code>
</div>
As you can see, the view primarily handles the HTML layout. There is little PHP logic included.
On line 11, in the <h1> tag, you see the static method called Html::encode(). This is one of the many handy helpers that Yii provides. In this case, it HTML encodes any special characters that may be present.
A very nice functionality of Yii views is the breadcrumbs function. Notice that on line 6 we are adding the page title to the breadcrumb array. This outputs the following in the view:
All elements in the breadcrumbs array will be listed here. The Home element is always present and is a link to the home page. In this case, we are looking at the About page, and this is reflected in the breadcrumb display.
Let's say, however, that you have specific data, perhaps from a database query, that you want to display in this view. How does the data value get passed to the view? Remember that to maintain the MVC paradigm, you would not query the database inside the view. You would merely display any value passed in.
To demonstrate, let's modify line 17 in the view file and change it to the following:
<code><?= $myInterestingData? ></code>
Now, let's go back to the 'about' action in the controller and modify it as follows:
public function actionAbout()
{
 $someVariable = 'Hello World!';

    return $this->render('about', [
     'myInterestingData' => $someVariable,
    ]);
}
Let's reload the page at:
http://yiisite.com/site/about
You should see the following displayed in your browser:
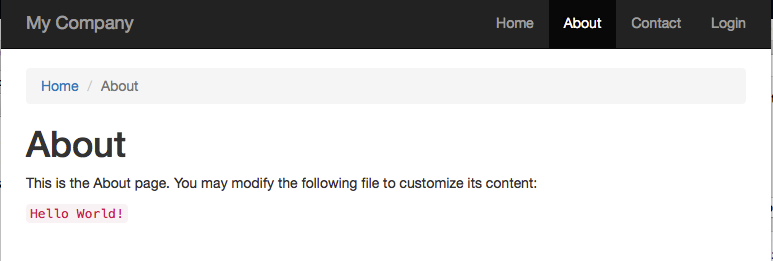
Notice in the action function that we are now passing a second parameter to the 'render' function. This second parameter is an associative array. The keys of the array become variables in the view and these variables contain whatever value is set for that key.
Thus, in the view example above, the variable
$myInterestingData
displays 'Hello World' which is the value of
$someVariable
, which is assigned to the key
myInterestingData
in the controller action.
6.2 View Layouts
"Well, that is all fine and dandy for the primary content being displayed, but where does the overall layout come from? Such as the nav bar along the top?" you say.
To answer that, let's go back to the views directory. Notice in addition to the sites directory, there is a directory called 'layouts'. Let's open that directory and take a look.
There is one file in the directory:
main.php
. This is the default layout template that is used by Yii to render views.
For your convenience, I will include the code here:
<?php
/* @var $this \yii\web\View */
/* @var $content string */
use yii\helpers\Html;
use yii\bootstrap\Nav;
use yii\bootstrap\NavBar;
use yii\widgets\Breadcrumbs;
use app\assets\AppAsset;
AppAsset::register($this);
?>
<?php $this->beginPage() ?>
<!DOCTYPE html>
<html lang="<?= Yii::$app->language ?>">
<head>
<meta charset="<?= Yii::$app->charset ?>">
<meta name="viewport" content="width=device-width, initial-scale=1">
<?= Html::csrfMetaTags() ?>
<title><?= Html::encode($this->title) ?></title>
<?php $this->head() ?>
</head>
<body>
<?php $this->beginBody() ?>
<div class="wrap">
<?php
NavBar::begin([
'brandLabel' => 'My Company',
'brandUrl' => Yii::$app->homeUrl,
'options' => [
'class' => 'navbar-inverse navbar-fixed-top',
],
]);
echo Nav::widget([
'options' => ['class' => 'navbar-nav navbar-right'],
'items' => [
['label' => 'Home', 'url' => ['/site/index']],
['label' => 'About', 'url' => ['/site/about']],
['label' => 'Contact', 'url' => ['/site/contact']],
Yii::$app->user->isGuest ?
['label' => 'Login', 'url' => ['/site/login']] :
[
'label' => 'Logout (' . Yii::$app->user->identity->username . ')',
'url' => ['/site/logout'],
'linkOptions' => ['data-method' => 'post']
],
],
]);
NavBar::end();
?>
<div class="container">
<?= Breadcrumbs::widget([
'links' => isset($this->params['breadcrumbs']) ? $this->params['breadcrumbs'] : [],
]) ?>
<?= $content ?>
</div>
</div>
<footer class="footer">
<div class="container">
<p class="pull-left">© My Company <?= date('Y') ?></p>
<p class="pull-right"><?= Yii::powered() ?></p>
</div>
</footer>
<?php $this->endBody() ?>
</body>
</html>
<?php $this->endPage() ?>
Let's examine some of the main features pertaining to view layout. Note that we will be referring back to this code later on for additional features.
$this->beginPage()
This starts buffering of the content that follows it. Everything after this call is buffered until the endPage() call.
Yii::$app->language
This sets the language for the page. This value can be changed globally through the config file by adding a key/value to the
$config[]
array, such as:
'language' => 'nl'
Html::csrfMetaTags()
This is a security feature (Yii is very secure) related to preventing Cross-Site Request Forgery.
Html::encode($this->title)
Recall back when we were working with the view? We had set this PHP property on line 7:
$this->title = 'About';
In this case, the value 'About' would be passed to the layout template and inserted into the HTML title tag and will HTML encode special characters.
$this->head()
Yii takes care of a great deal of behind the scenes code inclusions. This directs Yii to insert whatever needs to go within the head tags at this location. This would include the <meta> elements, custom <link> elements, and the appropriate CSS and JavaScript files.
$this->beginBody()
This marks the location to insert the appropriate JavaScript that is required to be inserted at the top of the body.
NavBar::begin, NavBar::end()
This is the code that creates the navigation bar across the top.
Nav::widget()
This creates the link menu on the top right.
Breadcrumbs::widget()
This inserts the breadcrumb link menu defined by the breadcrumbs array as directed in the view file.
$this->endBody()
This marks the place to insert JavaScript and CSS that is required to go at the end of the file.
$this->endPage()
This signals an end to buffering. It inserts the registered meta, link, style, and script elements into the resulting HTML page.
"Well, that is fine for the template part. But where does the view content go?"
I am glad you asked. Check out line 58:
<?= $content ?>
All the content spit out by the view, including any views referenced by that view will be output buffered and shoved into the magic variable $content. Wherever you insert that variable is where all the output produced by the view will be inserted.
6.2.1 Flash Messages
Yii supports something referred to as Flash Messages. This may be an alert widget that says data submitted was saved successfully. Or, it may be an alert saying there was some sort of error.
An example of a flesh message that may be used to indicate data was successfully saved is as follows:
Yii::$app->session->setFlash('success', "Customer Data Saved.");
The message is saved in session and displayed on the next view page.
However, out of the box, the Yii template does not support displaying flash messages in the layout.
I recommend you add the following code to your template. This code can go right before outputting the $content.
<?php
//SHOW ALL SUCCESS/ERROR MESSAGES
$flashMessages = Yii::$app->session->getAllFlashes();
if ($flashMessages) {
    foreach($flashMessages as $key => $message) {

        echo \yii\bootstrap\Alert::widget([
            'options' => [
	            'class' => ($key == 'success' ? 'alert-info fade' : 'alert-danger fade'),
            ],
            'body' => $message,
        ]);
    }
}
?>
The setFlash method takes two parameters. The first is used as a key to identify what kind of message this is. The second is the actual message text.
In this case, we are passing the key 'success'. This sets the bootstrap class to ''alert-info'.
Notice also that we are using another widget here, the Alert widget to display the alert messages.