3. Installation
There are a few steps that need to be taken to install Yii 2 and some decisions that need to be made. You will need access to the command line to proceed.
3.1 Composer
Installation is best managed by using Composer, a PHP package management tool that installs PHP applications along with all dependencies.
On Linux/Unix/OS X environments, you can simply use the following command through terminal:
			curl -s http://getcomposer.org/installer | php

			mv composer.phar /usr/local/bin/composer
Windows environments, such as WAMP, you can download the installer:
https://getcomposer.org/Composer-Setup.exe
3.2 Advanced Vs. Basic
Yii comes in two flavors: Advanced and Basic. You will need to decide on which one to install.
The basic template is more of a flat, simple structure. The advanced template has a number of additional features.
3.2.1 Advanced Template Features
If you are going to manage user authentication, you will find the features of the Advanced template to be much more accessible. While it is possible to manage user logins with the Basic template, a lot of the work has already been done for you when using the Advanced template.
Some of the extra features provided by the Advanced template are as follows:
3.2.1.1 Backend and Frontend
The advanced template has the concept of backend and frontend. Many web applications naturally fall into this category. You have a back office where users log in and engage in system activities. You also have a front end, which would include marketing content and descriptions of the services offered.
Yii advanced template allows both of these scenarios to be handled by the same installation. You are able to utilize the backend for system functionality while at the same time avail yourself of the templating and theming Yii provides to manage the front end website.
3.2.1.2 Environments
Web projects are generally broken up into two phases: development and production. Development may be done on localhost or staging server while production will reside on the main server facing the public.
There generally are a number of differences between the two deployments. These may include connecting to different databases, different configuration options and parameters and verbose debugging on development.
With the Advanced template, there is a directory called environments. This directory has two sub directories: dev and prod. The idea is to set all local configuration settings as needed for each environment. When deploying, these settings are copied over to the corresponding directories and files that Yii actually uses.
3.2.1.3 Migrations
The advanced template has a concept referred to as Migrations. This basically is a schema of your database. If deploying in a different environment, such as production as opposed to development, you can run the migration scripts using the console functions available through command line to automatically create the approriate database tables.
3.3 Installing via Composer
Using command line terminal, navigate to the directory where you want your application installed.
<appname> will be replaced with the name of the application. You can include the full absolute path. This will be the directory that Yii is installed into.
3.3.1 Install Basic Template
To install the basic template, execute the following commands:
			composer global require "fxp/composer-asset-plugin:1.0.0"

			composer create-project --prefer-dist yiisoft/yii2-app-basic <appname>
3.3.2 Install Advanced Template
To install the advanced template, execute the following commands:
			composer global require "fxp/composer-asset-plugin:1.0.0"

			composer create-project --prefer-dist yiisoft/yii2-app-advanced <appname>
Navigate to the <appname> directory and execute the following command:
php init
You will be presented with the following interactive dialog:
			Yii Application Initialization Tool v1.0


			Which environment do you want the application to be initialized in?


			[0] Development

			[1] Production


			Your choice [0-1, or "q" to quit]
Enter a 0 to initialize the application in the development environment. Enter a 1 to initialize the application in the production environment.
3.4 Configuration Files
You will now need to edit the configuration file to connect to your database.
3.4.1 Basic Template
The location of the config files for the basic template is: <appname>/config
The three config files are:
- db.php
This file contains the database connection parameters. - web.php
This file contains various settings that control how Yii functions. You will find the components array here. - params.php
This file contains global parameters that are available anywhere.
3.4.2 Advanced Template
There are three separate directories for config files in the advanced template. One set of config files controls the backend functionality, another set of config files controls the frontend functionality, the third set of config files is common to both frontend and backend.
The location of the config files is as follows:
<appname>/backend/config
<appname>/common/config
<appname>/frontend/config
The config files are as follows:
- bootstrap.php
You may not need to concern yourself with this file. - main.php and main-local.php
These files contain various settings that control how Yii functions. This is where you will set your database connection. You will find the components array here. - params.php and params-local.php
These files contain global parameters that are available anywhere.

What is the difference between main-local.php and main.php? In the config directory, you will notice a file named .gitignore. This applies to you if you are using a git repository for version tracking. .gitignore instructs that main-local.php should not be committed to the repository. This is so there can be different config settings (perhaps a local database) when working on your development environment and when you deploy to production. The same applies to param.php and param-local.php. |
3.4.3 Database Connection
Let's say we have set up a MySQL database using the following:
Host: localhost
User: yiiuser
Password: dbpassword
Databse: yiidb
You would set up your database configuration array as follows.
Basic Template
<appname>/config/db.php
return [
    'class' => 'yii\db\Connection',
    'dsn' => 'mysql:host=localhost;dbname=yiidb',
    'username' => 'yiiuser',
    'password' => 'dbpassword',
    'charset' => 'utf8',
];
Advanced Template
<appname>/common/config/main-local.php
return [
    'components' => [
        'db' => [
            'class' => 'yii\db\Connection',
            'dsn' => 'mysql:host=localhost;dbname=yiidb',
            'username' => 'yiiuser',
            'password' => ‘dbpassword,
            'charset' => 'utf8',
        ],
        'mailer' => [
            'class' => 'yii\swiftmailer\Mailer',
            'viewPath' => '@common/mail',
            'useFileTransport' => true,
        ],
    ],
];
3.5 Initialize Database
If using advanced template, there is one more step that will help greatly. Navigate to the <appname> directory in command line terminal and execute the following code:
php yii migrate
3.6 Set Document Root in Server Config
To navigate to your Yii install using a browser, you will need to set up your server to point to the correct document root.
3.6.1 Basic Template Document Root
The document root for the Basic template is:
<appname>/web
3.6.2 Advanced Template Document Root
With the Advanced template, you have two different document roots, one for the frontend and one for the backend.
Frontend Docmument Root
<appname>/frontend/web
Backend Docmument Root
<appname>/backend/web
3.6.3 Apache Config Example
Here is an example of what the Apache Vhost config could look like for the basic template.
Domain: mydomain.com
Appname: yii
Linux system path: /var/www/mydomain.com/yii/web
<VirtualHost *>
    DocumentRoot "/var/www/mydomain.com/yii/web"
    ServerName www.mydomain.com
    ServerAlias mydomain.com
    <Directory "/var/www/mydomain.com/yii/web">
        AllowOverride All
    </Directory>
</VirtualHost>
3.7 Default Install
If you navigate to your domain using your browser, you should see the following.
3.7.1 Basic Template
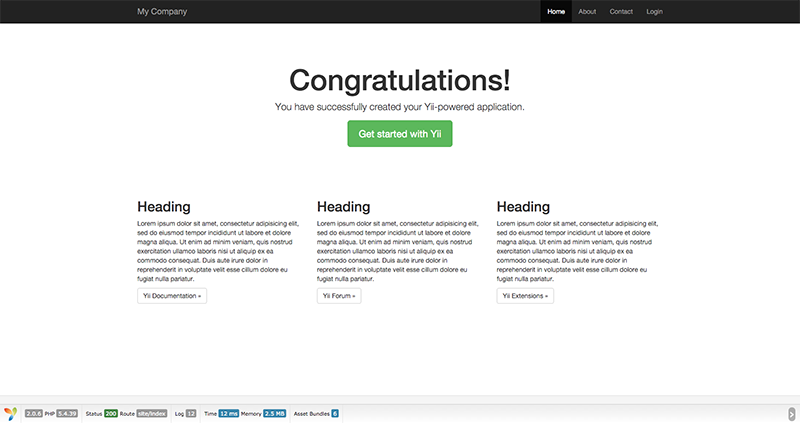
You will also see four links in the top navigation bar: Home, About, Contact and Login
These pages have also been created. You will notice each has a breadcrumb navigation menu by default.
The Login page does work. You can log in with username 'admin' and password 'admin'. However, with the basic template, the login does not actually use the database. The login is hard coded in model User.php. If you want a functional DB connected login system installed by default, you need to use the Advanced template.
3.7.2 Advanced Template Frontend
The Advanced Template Frontend is almost identical to the basic template, with the exception of an additional link in the top navigation menu: signup.
With the advanced template, the Login system is fully functional and connected to the database if you set your database config parameters and ran php yii migrate. However, as you have no users yet, there is nothing to use to log in with.
The signup page is fully functional though, and you can use it at this point to create a new user. As default, the signup page asks for the fields: Username, Email and Password. Fill those fields in and click Signup. You will create a new user and will be logged in automatically. You can log out using the Logout link in the top nav bar on the right. You can log back in by clicking the Login link in the same nav bar.
The contact page contains a form, complete with a CAPTCHA verification code. However, as default, submitting the form does not actually send an e-mail. Instead, it saves the form submission as a file at <appname>/runtime/mail. To have Yii actually send e-mail, you must configure the mailer functions in the config file.
"But, what e-mail address will Yii send the contact form submission to?" you ask.
Good question. Remember the config files? One file was called params.php. If you navigate to that file and take a look at it in an editor, you will see the following:
return [
    'adminEmail' => 'admin@example.com',
];
By default, the form will be sent to 'admin@example.com' once the e-mail transport is set up.
And, how does the script access that parameter?
If you open up SiteControler.php in the controllers directory, you will see a function called actionContact. In that function you will see this passed to $model->contact():
Yii::$app->params['adminEmail']
|
Accessing params anywhere You can store any data you like in the params.php file and access it anywhere. Simply add additional key/value pairs to the params array. Thus, if you wanted to have the string value 'bar' be available anywhere in Yii, you could add 'foo' => 'bar' to the params array. Then, whenever you wanted to access that string value, you would simply use Yii::$app->params['foo']. |
|
Accessing application objects or values. You will see Yii::$app-> used quite regularly. This is how you access Yii global objects and values. For example, if you want to access the database connection, you would use: Yii::$app->db A quick note on namespaces: The above examples will only work where you have included 'use Yii;' at the top of the script. If you do not specify that you are using Yii namespace, you will need to prefix the above with a slash as such: \Yii::$app-> |
3.7.3 The Debug Bar
At the bottom of the page you should see the following:

This is the debug bar and provides access to a number of troubleshooting tips that are very handy. For example, you submitted a login request and want to see what database queries where executed in the process of checking the login. Simply click the DB box and you will see a list of all database queries just executed. In the example above, 3 quires where just executed and it took 7ms to execute.
For the debug bar to show, you need to have the following line of code in your /web/index.php file:
defined('YII_DEBUG') or define('YII_DEBUG', true);
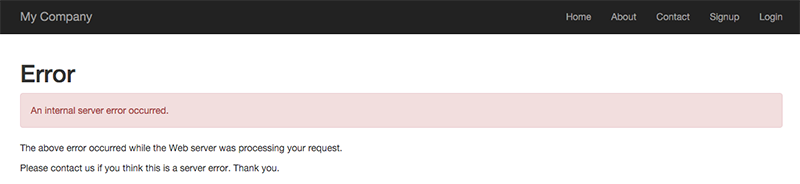
If you set that to false instead, the debug bar will not show up. Also, when debug is set to true, a great deal of debugging info is presented in the case of a script error. You will see something like this:
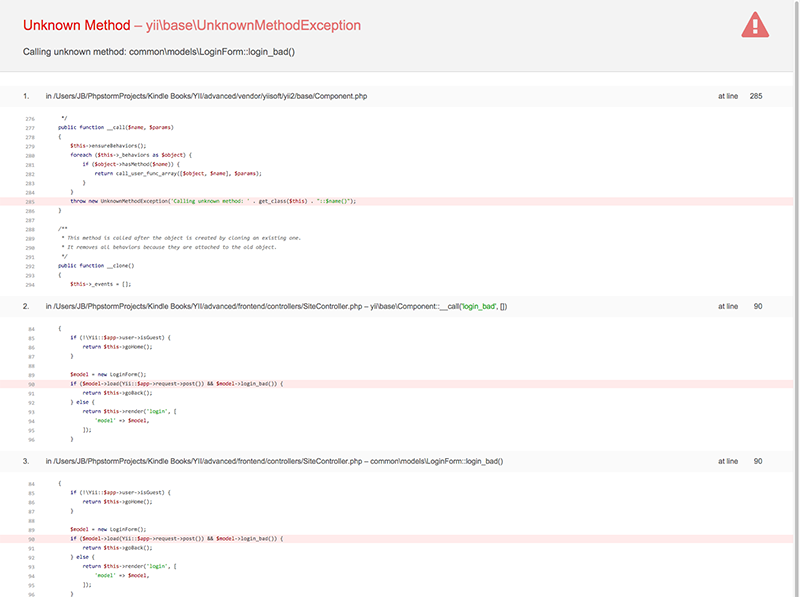
In this case, I changed the call to the login function from login() to login_bad(). As you see, it gives me a detailed explanation of the error, including a stack trace all the way back to the originating bug. You will notice in script 3 in the stack trace, which is SiteController.php file, on line 90, I have wrongly called the function login_bad() which does not exist.
With 'YII_DEBUG' set to false, Yii returns the following page instead: